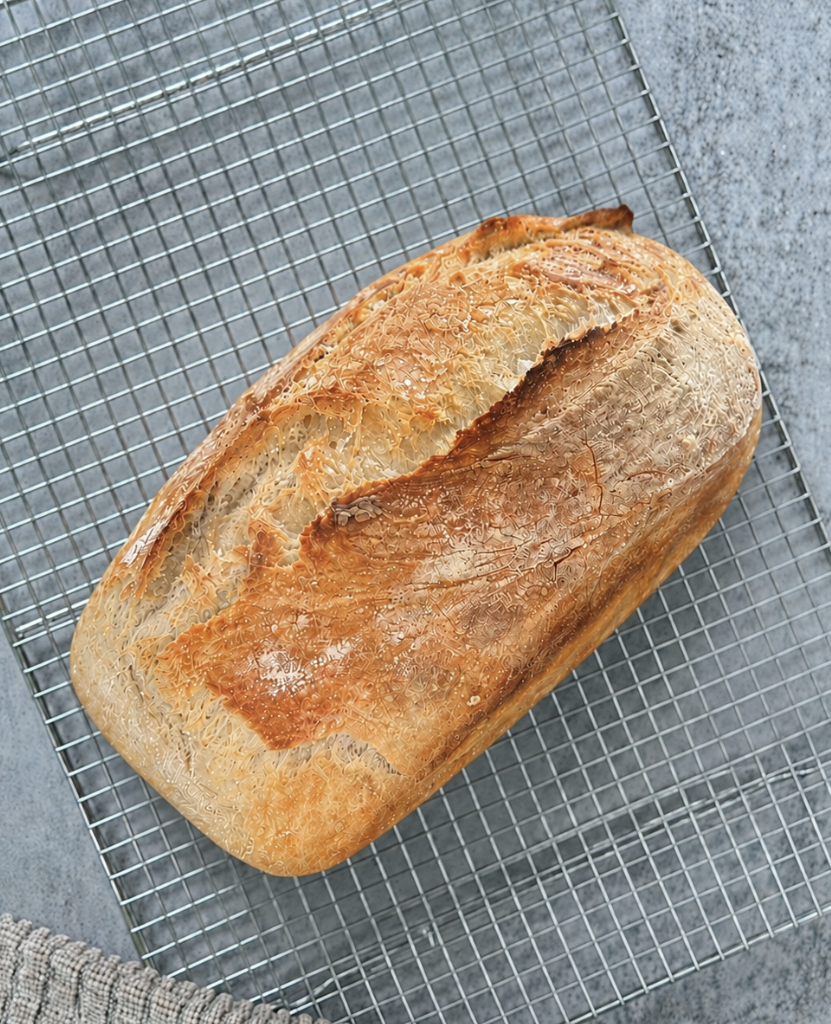
Easy Artisan Bread Recipe for Beginners (Only 4 Ingredients)
This post may contain affiliate links. See my Affiliate Disclosure for more details.
There’s something incredibly satisfying about pulling a fresh loaf of homemade artisan bread out of the oven. The smell fills the entire house, the crust turns perfectly golden, and for a moment you feel like you've somehow become the kind of person who bakes bread from scratch.
That's exactly how this recipe started for me.
Before I ever made sourdough, before I learned about starters, stretch and folds, hydration percentages, and all the other bread-making terms that can feel overwhelming at first, I started with this easy artisan bread recipe. It only requires four ingredients, comes together in a single afternoon, and doesn't require any special bread-making knowledge.
If you've ever wanted to try baking bread but felt intimidated by sourdough, this is the perfect place to start. The crust is crisp, the inside is soft and chewy, and it tastes amazing with butter, soup, sandwiches, or honestly just standing at the counter eating a warm slice.
Why This Is the Perfect Beginner Bread Recipe
One of the things I love most about this recipe is how simple it is. There are no stretch and folds. No feeding a sourdough starter. No waiting two days before you can bake. No complicated techniques. Just mix the ingredients together, let the dough rise, shape it, bake it, and enjoy fresh homemade bread the very same day.
If you're curious about bread making but don't know where to start, this recipe gives you a chance to build confidence before diving into sourdough.
How to Make My Easy Artisan Bread Loaf
For the full recipe, please see the recipe card below.
Jump to Recipe- Activate the yeast: In a large mixing bowl, combine the warm filtered water and instant yeast. Let it sit for about 10-15 minutes until the yeast becomes foamy.
- Add the flour: Gradually add the bread flour, mixing until incorporated.
- Add the salt: Stir in the salt and continue mixing until a shaggy dough begins to form.
- Work the dough: Use your hands to gently bring the dough together until it becomes smooth and cohesive. It doesn't need to be perfect.
- Let rise: Cover the bowl with a clean towel or plastic wrap and let the dough rise for 3-4 hours in a room-temperature spot. I usually place mine in the microwave or oven (turned off) to keep it undisturbed.
- Shape the dough: Once the dough has doubled in size, transfer it to a lightly floured surface. Shape it into a round loaf.
- Optional shaping method: If you'd like a little more structure, gently flatten the dough into a rectangle, fold it into thirds like a letter, then roll it into a ball before shaping.
- Rest during preheat: Lightly flour a proofing basket or bowl lined with a towel. Place the dough seam-side down into the basket and dust the top with a little more flour.
- Preheat the oven: Place your Dutch oven (with the lid on) into the oven and preheat to 450°F.
- Transfer the dough: Carefully remove the hot Dutch oven. Using parchment paper or a bread sling, transfer the dough into the pot.
- Score the loaf: Use a bread lame or sharp knife to make one or two cuts across the top of the dough.
- Bake covered: Cover with the lid and bake for 30 minutes.
- Bake uncovered: Remove the lid and continue baking for another 12-14 minutes, or until the crust is deeply golden brown. Every oven is different, so if yours tends to run hot, you may prefer baking at 425°F.
- Cool completely: Remove the bread immediately from the Dutch oven and place it on a cooling rack. Allow it to cool for at least 1-2 hours before slicing.
- Slice and enjoy!
My Favorite Ingredient Brands & Tools
I have no affiliation with any of these brands, I just personally love them!
I love knowing what baking ingredients and tools helped create a recipe, so if you're just getting started with bread making, here's what I use.
- Bread Flour (Organic, unbleached): King Arthur Baking Company from Amazon or your local grocery story
- Cast-Iron Loaf Pan: Northriver Casting from Amazon
- Dutch Oven: Crustlove from Amazon
- Fleischmann's Bread Machine Yeast: from Amazon or your local grocery story
- Bread Knife: from Amazon
- Manual Bread Slicer: Vanerepok from Amazon
- Reusable Silicone Bread Sling: from Amazon
- Bread Banneton Proofing Basket Set: Rorecay from Amazon (love that this comes with lots of different tools)
→ [Shop My Favorite Bread Baking Essentials]
A Few Tips for the Best Results
- Use warm water, not hot water. If the water is too hot, it can kill the yeast and prevent the dough from rising properly.
- Be patient during the rise. Depending on the temperature of your house, your dough may need closer to 3 hours or closer to 4 hours. (I normally do 4 hours)
- Don't overthink the shaping process. One of the beautiful things about artisan bread, or bread in general, is that it doesn't need to look perfect.
- Preheat your Dutch oven. This helps create that beautiful crusty exterior that artisan bread is known for. I'll sometimes even spray the top of my dough with some water before putting it in the oven to give it an extra crispy top.
- Allow the bread to cool completely before slicing. I know it's hard, but cutting into it too soon can make the inside gummy.
What to Serve With Artisan Bread
This bread is incredibly versatile. We love it with soups during the Fall and Winter, toasted with butter in the morning, or alongside pasta dinners.
It's also delicious for sandwiches, grilled cheese, avocado toast, dipping into olive oil, or serving on a charcuterie board when friends come over. Honestly, it's hard to go wrong with fresh bread.
Storage Instructions
Store the bread at room temperature or in the fridge in an airtight container or bread bag for up to 3 days. If you won't finish it within a few days, slice the loaf and freeze it. Then you can pull out individual slices whenever you need them.
To reheat, place slices in the toaster or warm them in a 350°F oven for a few minutes.
The Bread Recipe That Started It All
This loaf will always have a special place in my kitchen because it's what gave me the confidence to start baking bread in the first place. For the longest time, bread making felt intimidating. But once I realized how simple this recipe was, it opened the door to learning sourdough and exploring more from-scratch baking.
If you've been wanting to try homemade bread, let this be your sign to start. You don't need fancy ingredients or years of experience. Just four simple ingredients, a little patience, and a warm loaf waiting for you at the end.
Happy bread baking, friend!

Easy Artisan Bread Recipe for Beginners
Equipment
- 1 Cast-Iron Bread Pan preferred
- 1 Dutch Oven or Bread Pan alternative
- 1 Large Mixing Bowl
- 1 Proofing Basket
- 1 Parchment Paper or Bread Sling
- 1 Bread Lame or Sharp Knife
- 1 Cooling Rack
Ingredients
- 1½ cups warm, filtered water
- 2 tsp instant active yeast
- 3 cups bread flour organic
- 2 tsp salt
Instructions
- Combine warm water and yeast in a large mixing bowl. Let sit for 10-15 minutes until foamy.
- Gradually add bread flour and mix until incorporated. Add salt and continue mixing until a shaggy dough forms.
- Use your hands to bring the dough together until smooth.
- Cover and allow the dough to rise for 3-4 hours in a warm, draft-free location until doubled in size.
- Transfer dough to a lightly floured surface and shape into a round loaf or sandwich loaf.
- Place dough into a lightly floured proofing basket or bowl lined with a floured tea towel. Cover while the oven preheats.
- Place a Dutch oven or cast-iron bread pan into the oven and preheat to 450°F.
- Carefully transfer dough onto parchment paper or a bread sling and place into the hot pan. Score the top of the loaf with a bread lame or sharp knife.
- Cover with lid and bake for 30 minutes.
- Remove the lid and bake for an additional 12-14 minutes, or until the loaf is golden brown. (if your oven is hotter than normal, drop temp to 425°F)
- Remove bread from the pan immediately and cool on a wire rack for 1-2 hours before slicing.
Notes
- Use warm water, not hot water, to avoid damaging the yeast.
- Bread flour provides the best texture, but all-purpose flour can work in a pinch.
- You can make 1 or 2 loaves out of this recipe, but I normally do one.
- For a sandwich-style loaf, I prefer baking in a cast-iron bread pan. For a traditional artisan loaf, use a Dutch oven.
- Allow the bread to cool before slicing for the best texture.
If You Liked (or Loved) This Recipe…
I'd love to see it! Send me a message @ItsHannahCallahan or tag me on your Instagram post or story with a picture! You can also leave comments below telling me how you liked (or loved) it, and if you made any substitutions!
If you're new to ItsHannahCallahan, you can read more about me here—and come say hi over on Instagram.